JavaWeb4——Servlet规范
本文共 3012 字,大约阅读时间需要 10 分钟。

1.Servlet规范介绍
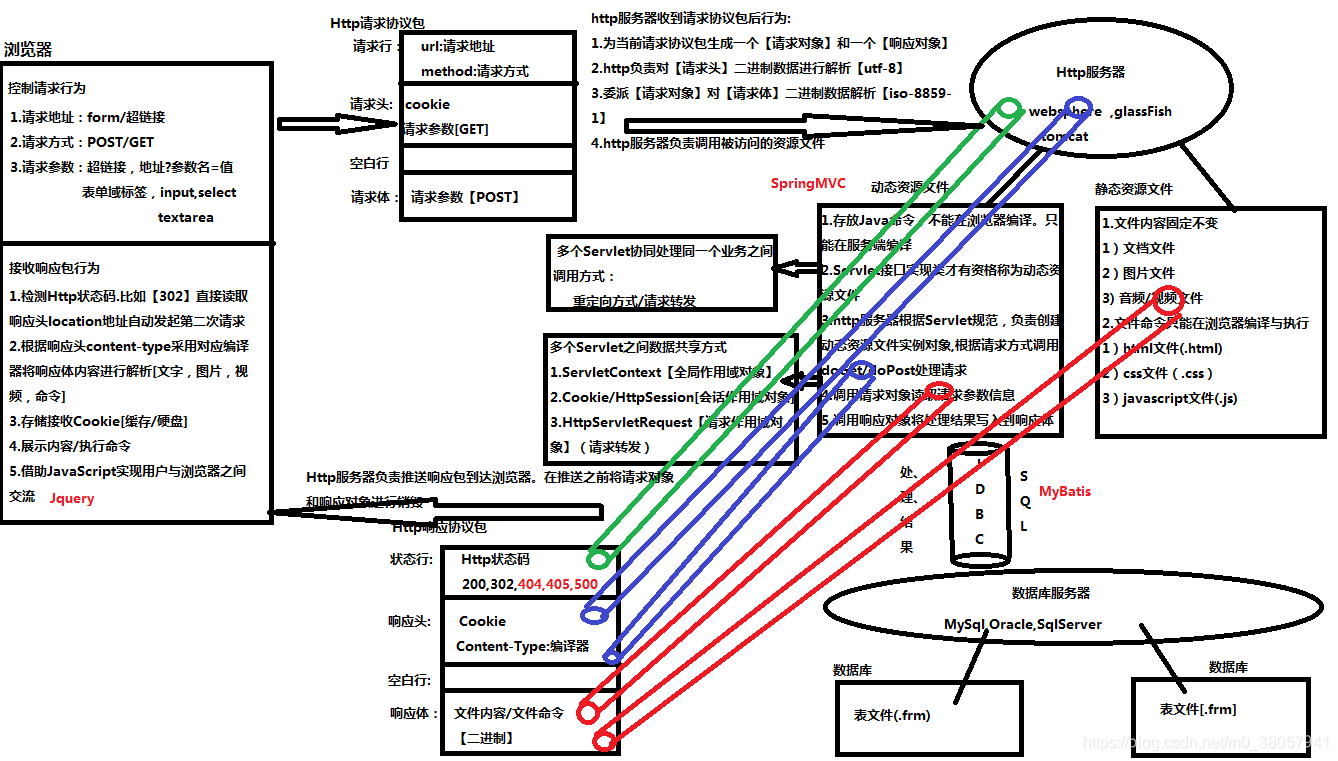
- 当Http服务器接收请求后,如何知道调用哪些java类来处理请求呢? 有些类可能就是用来封装变量的,有些类才是用来处理请求的。为了识别出那些具有处理请求的类,定义了一个接口,这个接口就叫Servlet接口,如果想要让业务类具备处理请求的能力,都必须实现这个接口,实现了接口的业务类叫做Servlet。
- 对于特定的请求,Http服务器如何知道由哪个Servlet来处理?Servlet又是由谁来实例化呢? 于是又有了Servlet容器。Http服务器把请求交给Servlet容器去处理,Servlet容器会将请求转发到具体的Servlet,如果这个Servlet还没创建,就加载并实例化这个Servlet,然后调用这个Servlet的接口方法。
- Servlet接口其实是Servlet容器和具体业务类之间的接口:
 Http服务器不直接调用业务类,而是把请求交给容器来处理,容器通过Servlet接口调用业务类。因此Servlet接口和Servlet容器的出现,使Http服务器和业务类解耦。
1.1.servlet规范来自于JavaEE规范中的一种
- Servlet规范:Servlet接口 + Servlet容器。
- Tomcat按照Servlet规范的要求实现了Servlet容器,同时它也具有Http服务器的功能。(如果我们要实现新的业务功能,只需要实现一个Servlet,然后把它注册到Tomcat(Servlet容器)中,剩下的事情由Tomcat帮我们来处理)。
1.2.作用:
1)在Servlet规范中,指定【动态资源文件】开发步骤
2)在… … … …中,指定Http服务器调用【动态资源文件】规则 3)在… … … …中,指定Http服务器管理【动态资源文件】实例对象规则2.Servlet接口实现类
- 2.1.Servlet接口来自于Servlet规范下的一个接口,这个接口在Http服务器提供jar包。
- 2.2.Tomcat服务器下lib文件有一个servlet-api.jar存放Servlet接口(javax.servlet.Servlet)
- 2.3.Servlet规范中,Http服务器能调用的【动态资源文件】必须是Servlet接口实现类 例子:1、不是动态资源文件,Tomcat无权调用
-
class Student{ //不是动态资源文件,Tomcat无权调用 }
2、合法动态资源文件,Tomcat有权利调用
-
class Teacher implements Servlet{ Servlet obj = new Teacher() obj.doGet(); }
3.Servlet接口实现类开发步骤
-
1.创建一个Java类继承HttpServlet父类,使之成为1个Servlet接口实现类
-
2.重写HttpServlet父类两个方法。doGet()或doPost()
get 浏览器----> oneServlet.doGet() post 浏览器----> oneServlet.doPost()
-
3.将Servlet接口实现类信息注册到Tomcat服务器
【网站】----> 【web】 ----> 【web-inf】----> web.xml -
mm com.bjpowernode.controller.OneServlet mm /one

- 如果现在浏览器向Tomcat索要OneServlet时地址 http://localhost:8080/myWeb/one


4.Servlet对象生命周期
-
1.网站中所有Servlet接口实现类的实例对象,只能由Http服务器负责创建
开发人员不能手动创建Servlet接口实现类的实例对象 -
2.默认情况下,Http服务器接收到对于当前Servlet接口实现类第1次请求时,自动创建Servlet接口实现类的实例对象。
-
在手动配置情况下,要求Http服务器在启动时自动创建某个Servlet接口实现类的实例对象。
-
mm com.bjpowernode.controller.OneServlet 30 -
3.在Http服务器运行期间,1个Servlet接口实现类只能被创建出1个实例对象
-
4.在Http服务器关闭时刻,自动将网站中所有Servlet对象进行销毁。
5.HttpServletResponse接口
5.1.介绍:
- 1.HttpServletResponse接口来自于Servlet规范中,在Tomcat中存在servlet-api.jar
- 2.HttpServletResponse接口实现类由Http服务器负责提供
- 3.HttpServletResponse接口负责将doGet/doPost方法执行结果写入到【响应体】
- 4.开发人员习惯于将HttpServletResponse接口修饰的对象称为【响应对象】
5.2.主要功能
- 1.将执行结果以二进制形式写入【响应体】
- 2.设置响应头中【content-type】属性值, 从而控制浏览器使用对应编译器将响应二进制数据编译为【文字、图片、视频、命令】
- 3.设置响应头中【location】属性, 将一个请求地址赋值给location,从而控制浏览器向特定服务器发送请求。
6.HttpServletRequest接口
- 1.HttpServletRequest接口来自于Servlet规范中,在Tomcat中存在servlet-api.jar
- 2.…………………………实现类由Http服务器负责提供
- 3.…………………………负责在doGet/doPost方法运行时读取Http请求协议包中信息
- 4.开发人员习惯于将………………修饰的对象称为【请求对象】
作用:
- 1.可以读取Http请求协议包中【请求行】信息
- 2.可以读取保存在Http请求协议包中【请求头】或则【请求体】中请求参数信息
- 3.可以代替浏览器向Http服务器申请资源文件调用
7.请求对象和响应对象生命周期
- 1.在Http服务器接收到浏览器发送的【Http请求协议包】之后, 生成一个【请求对象】和一个响应对象
- 2.在Http服务器调用doGet/doPost方法时,负责将【请求对象】和【响应对象】 作为实参传递到方法,确保doGet/doPost正确执行
- 3.在Http服务器准备推送Http响应协议包之前, 负责将本次请求关联的【请求对象】和【响应对象】销毁
【请求对象】和【响应对象】生命周期贯穿一次请求的处理过程中
【请求对象】和【响应对象】相当于用户在服务端的代言人转载地址:http://nmqn.baihongyu.com/
你可能感兴趣的文章
NIFI大数据进阶_实时同步MySql的数据到Hive中去_可增量同步_实时监控MySql数据库变化_操作方法说明_01---大数据之Nifi工作笔记0033
查看>>
NIFI大数据进阶_离线同步MySql数据到HDFS_01_实际操作---大数据之Nifi工作笔记0029
查看>>
NIFI大数据进阶_离线同步MySql数据到HDFS_02_实际操作_splitjson处理器_puthdfs处理器_querydatabasetable处理器---大数据之Nifi工作笔记0030
查看>>
NIFI大数据进阶_离线同步MySql数据到HDFS_说明操作步骤---大数据之Nifi工作笔记0028
查看>>
NIFI大数据进阶_连接与关系_设置数据流负载均衡_设置背压_设置展现弯曲_介绍以及实际操作---大数据之Nifi工作笔记0027
查看>>
NIFI数据库同步_多表_特定表同时同步_实际操作_MySqlToMysql_可推广到其他数据库_Postgresql_Hbase_SqlServer等----大数据之Nifi工作笔记0053
查看>>
NIFI汉化_替换logo_二次开发_Idea编译NIFI最新源码_详细过程记录_全解析_Maven编译NIFI避坑指南001---大数据之Nifi工作笔记0068
查看>>
NIFI汉化_替换logo_二次开发_Idea编译NIFI最新源码_详细过程记录_全解析_Maven编译NIFI避坑指南002---大数据之Nifi工作笔记0069
查看>>
NIFI集群_内存溢出_CPU占用100%修复_GC overhead limit exceeded_NIFI: out of memory error ---大数据之Nifi工作笔记0017
查看>>
NIFI集群_队列Queue中数据无法清空_清除队列数据报错_无法删除queue_解决_集群中机器交替重启删除---大数据之Nifi工作笔记0061
查看>>
NIH发布包含10600张CT图像数据库 为AI算法测试铺路
查看>>
Nim教程【十二】
查看>>
Nim游戏
查看>>
NIO ByteBuffer实现原理
查看>>
Nio ByteBuffer组件读写指针切换原理与常用方法
查看>>
NIO Selector实现原理
查看>>
nio 中channel和buffer的基本使用
查看>>
NIO三大组件基础知识
查看>>
NIO与零拷贝和AIO
查看>>
NIO同步网络编程
查看>>